How to Make A Robot Valentine Box
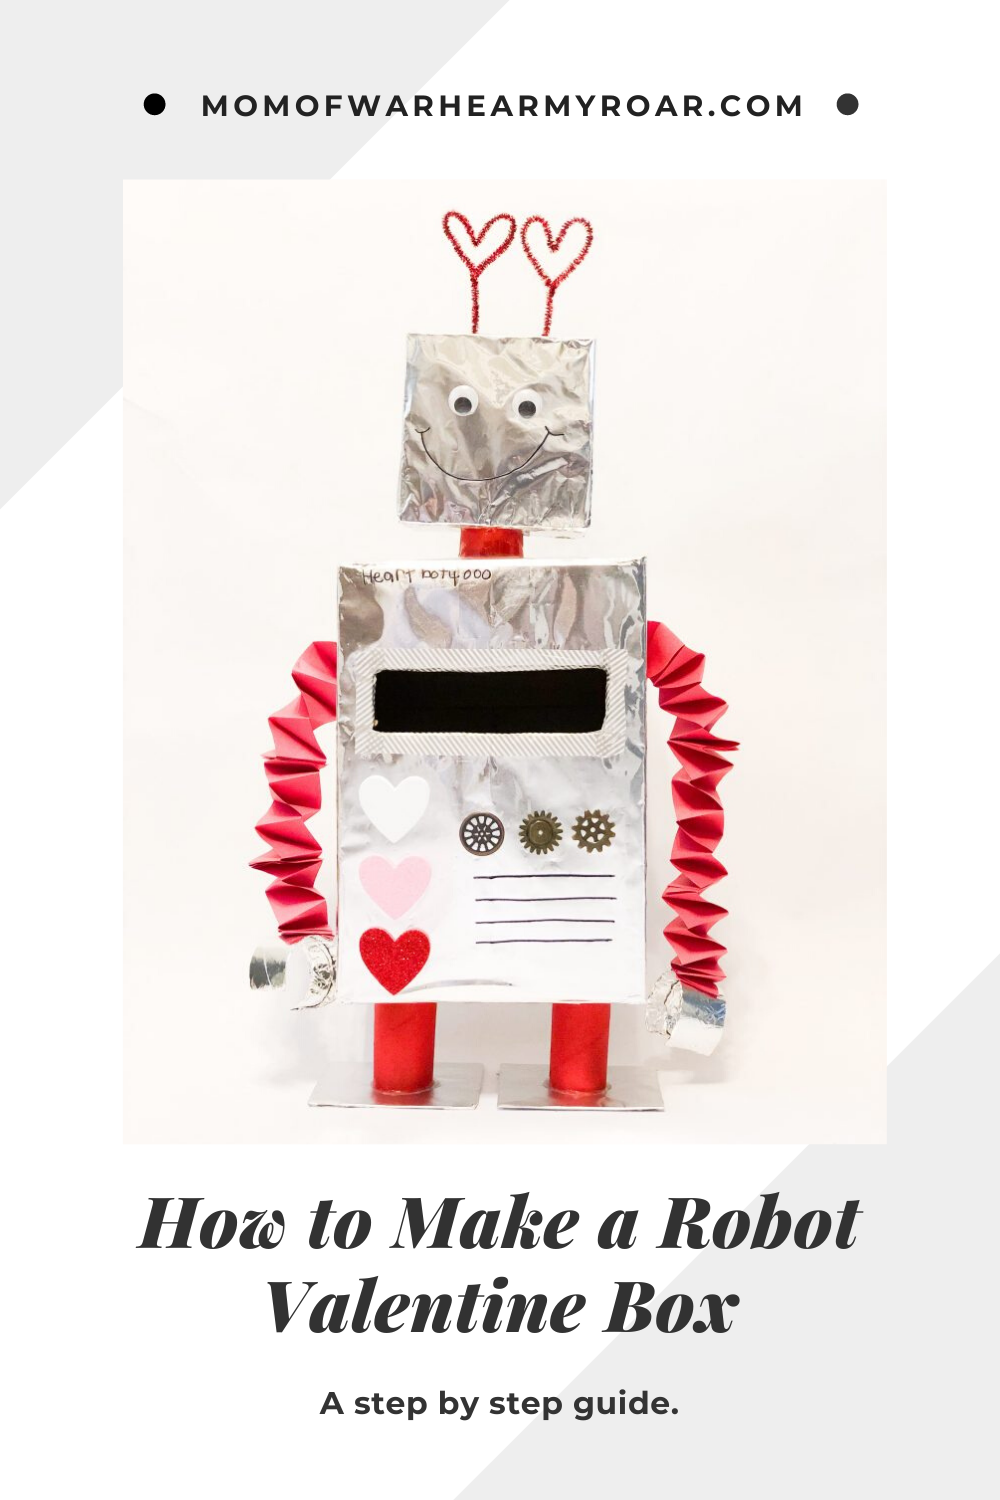
We enjoy making Valentine boxes every year! This year, we chose a robot valentine box. Let me teach you how to make it!
How to Make A Robot Valentine Box
Supplies needed:
a very small box- I used a small treat box
a small box (tennis shoe shoebox size)- I used a small shipping box
extra cardboard- I'm sure you have some laying around the house
toilet paper (3) or a paper towel roll
scissors or box cutter
red pipe cleaners- I used sparkly ones
black sharpie
paint- We chose red
Valentine's Day stickers and/or decor
googly eyes(optional)
Don't be afraid to use difference sizes of boxes than I did! It doesn't have to be exact, and a different shape or size will add character to your box.
Creating The Robot
1. Cut your toilet paper/paper towel rolls. With these you will be making two legs, a neck, and the claws.
The neck needs to be fairly small. A longer neck makes the robot less sturdy when standing. I had to cut mine shorter when it came time to it.
Cut the circles for the claws open.
2. Paint the legs and neck so they have time to dry. We chose red, but you can make it your own and choose whatever you want!
3. Prepare your shipping box. Use the duct tape to close all sides of the box. Cut a slit on the front in the upper half of the box for the Valentines to slip through. Remember to make the slit wide enough for Valentines with goodies attached to go through.
Cut a trap door in the back! Only cut three sides, so that it creates a flap.

Foil
4. Wrap the small treat box (the head) and the shipping box (body) in aluminum foil. Using heavy duty foil is easiest, because it doesn't tear as you wrap it around the boxes. Use the silver duct tape to secure!
The head was fairly easy. I wrapped it like a present. The body was a little harder with the slit and trap door. I ignored the slit and cut through the aluminum foil carefully after I wrap the box. On the back of the box, I had to use spare pieces to puzzle and patch my way around the trap door.

5. Use duct tape to create a pull for the trap door. I cut off a piece of tape a few inches long and folded it longways three times. Then I folded it in half to make a loop and taped it on the inside of the door.
6. Wrap your claws in foil.
7. Use the spare cardboard you have to cut out two square for feet. Then wrap them in tin foil.
Decorate
9. Decorate the head. Draw a big smile and add your googly eyes. If you don't have googly, use white and black construction paper to make eyes!
8. Decorate the body. This was Wesley's favorite part. Get creative! Decorate however you want. I put a link to the gears we used on our body under the supplies listed above. We used sparkly foam heart stickers too. Around the slit, I used thin decorative duct tape I just happen to have in our craft drawers.
Don't forget to name your robot! Wesley named his Heartbot 4000.
9. Start assembling! This takes some time and patience.
I glued the legs to the feet and waited about an hour. Then I turned the body upside down and glued the completed legs to the body. I let them dry for an hour or so. Then I turned the robot right side up and did the same for the head. I used extra glue here just in case!
Don't be scared to use more duct tape here if you feel like you can't get them secure enough!
10. Make the arms. I used red construction paper. You can use whatever color you want. You can even use two colors!
I had to google how to make these bad boys. I've never made a "paper snake" before.
Cut 1.5 (approximately, I eye balled it) inch strips of construction paper length wise. Glue two strips together at their ends so they make a right angle, then take turns folding the strips over themselves until you run out. Secure with glue. Sometimes I would have to cut a little extra off.
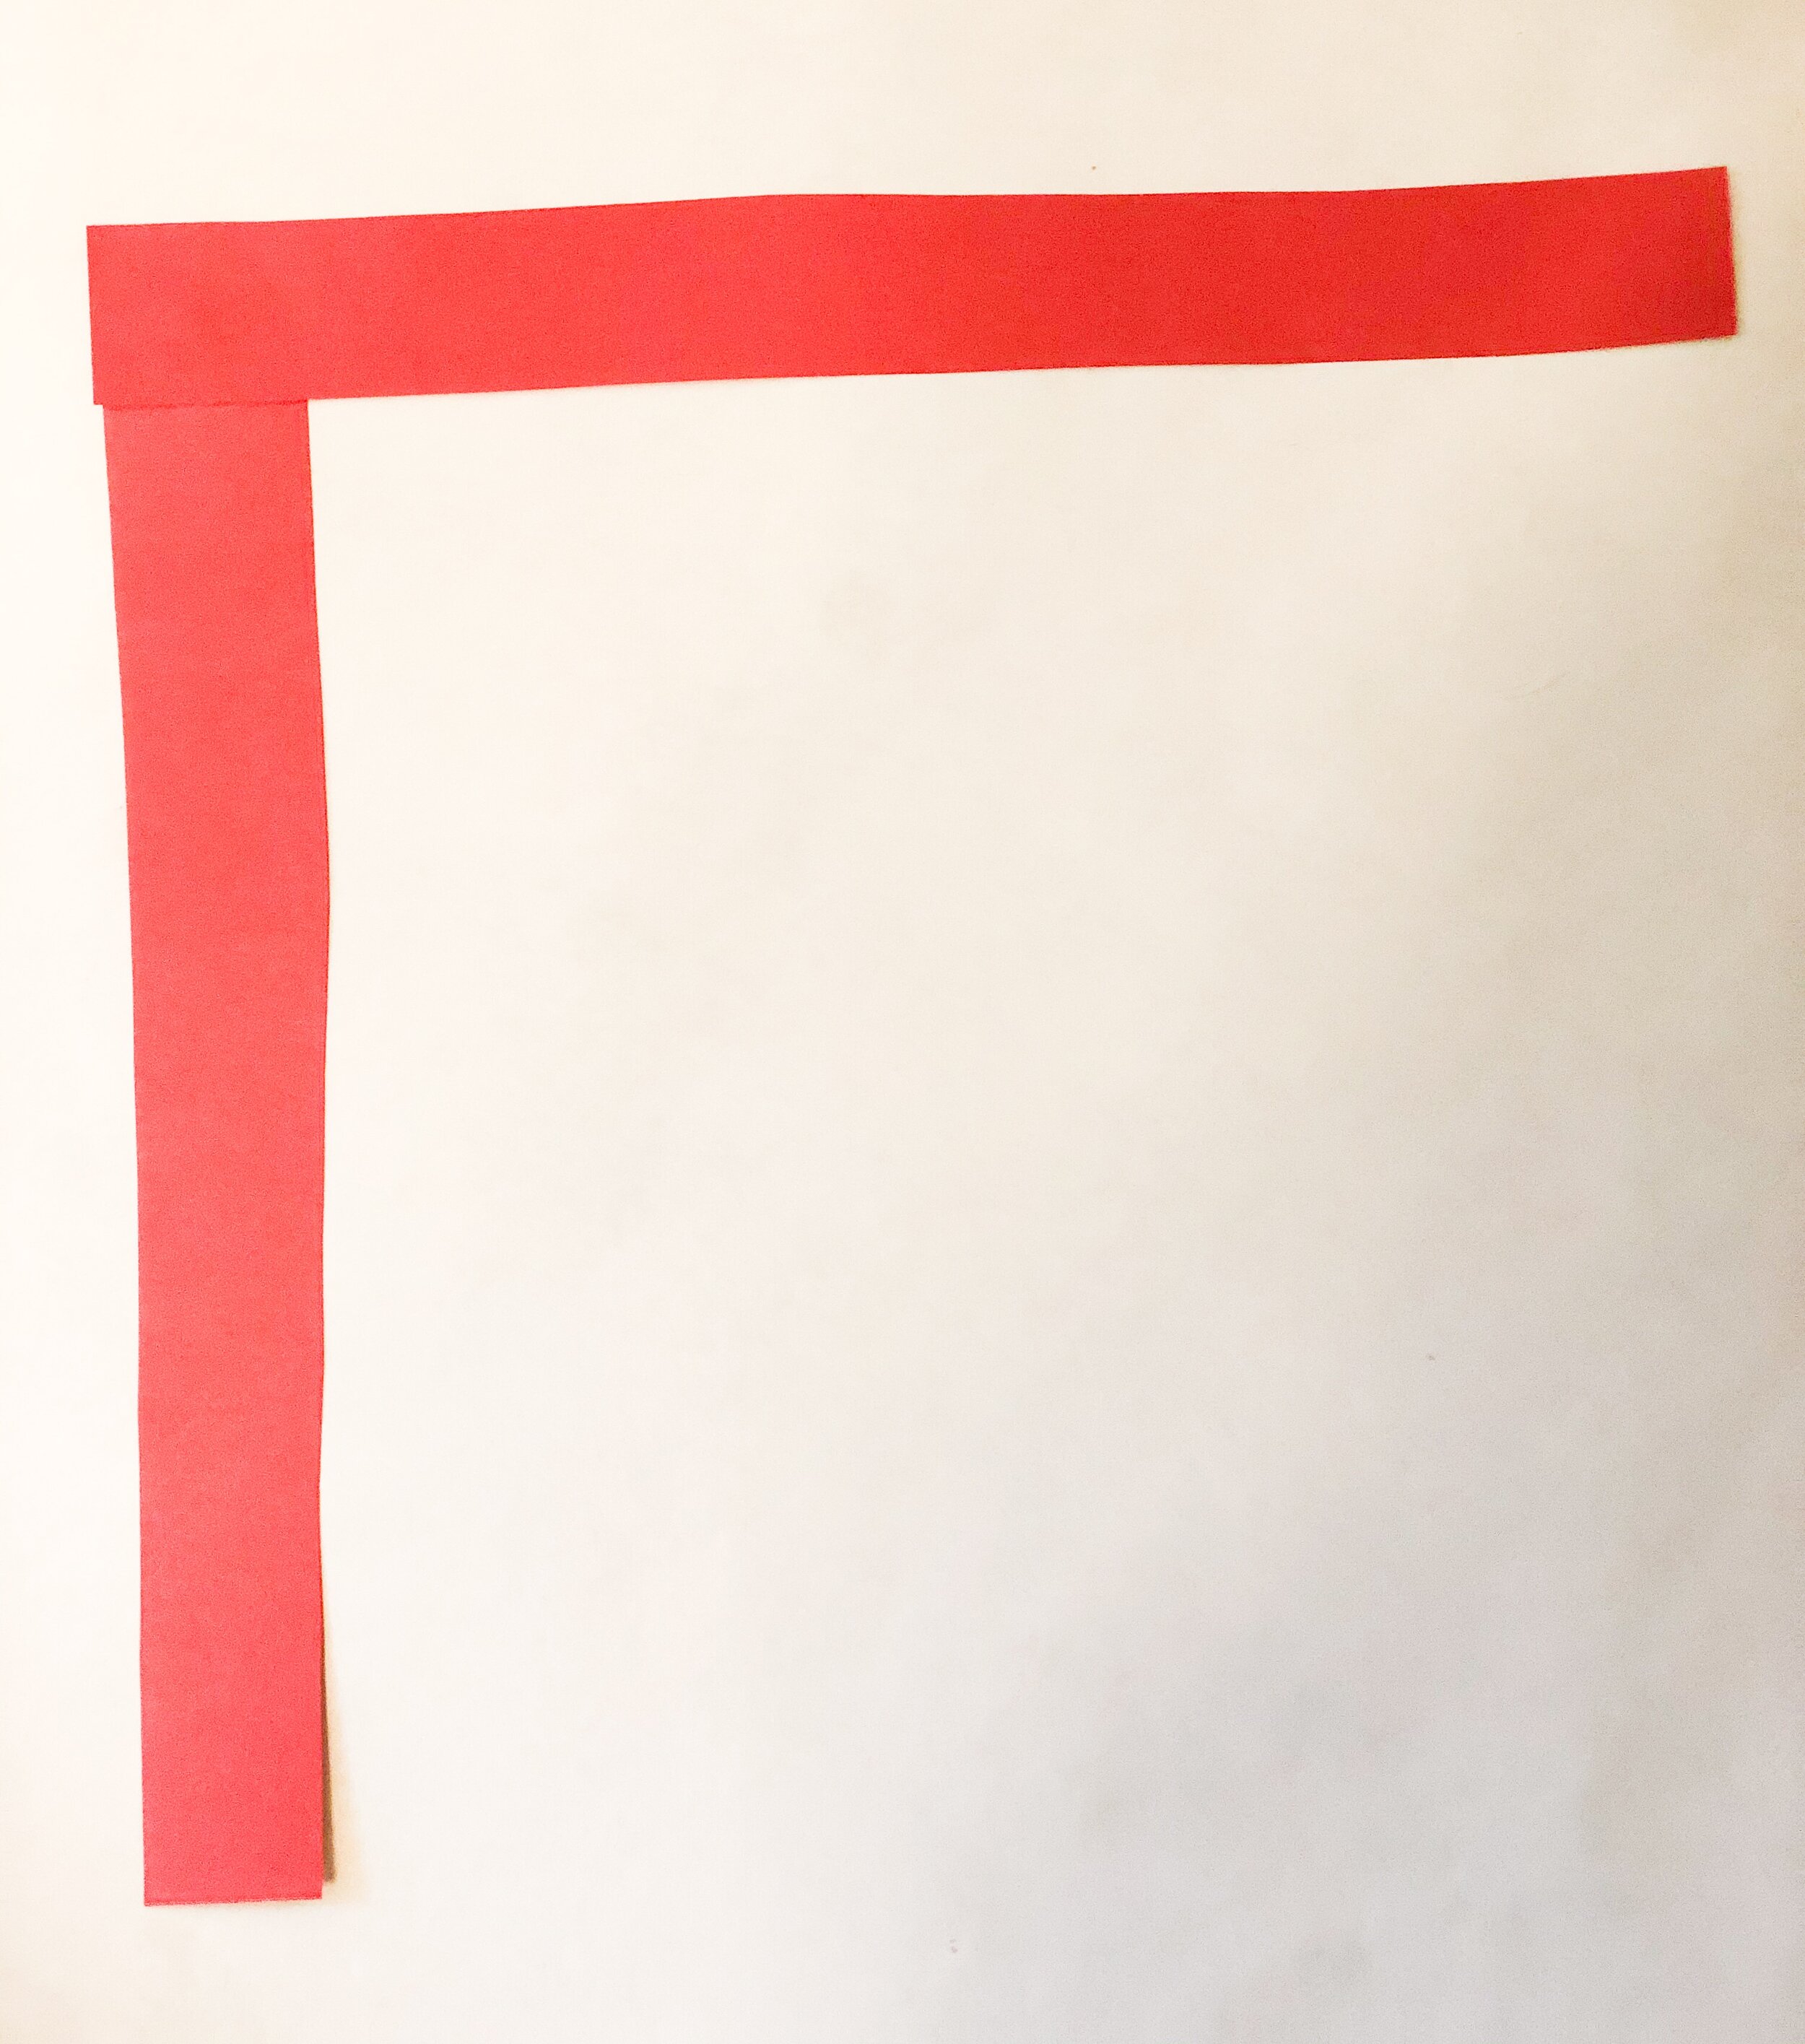
I made six of these total. I glued three together for each arm, then I glued the claws to them.

Finishing Touches
11. Once the head is dry, glue the arms on the body. Finally, make your heart antennas and tape them on!

Mom of WAR- Robot Valentine Box

Mom of WAR- Robot Valentine Box
This project is not for the faint of heart. It takes some patience, but it is so stinking cute when you are done.
Feel free to get as creative as you want. Have fun with it! And don't be afraid to use too much duct tape. Use it wherever you can.
Let me know if you have any questions, I am happy to help however I can!
Like the robot valentine box? I can also teach you how to make a dinosaur Valentine box!